29 October 2008

Adobe Acrobat alternatives: Find the best PDF software for you

Working with PDF files is inevitable. Most journal articles are downloaded in PDF format. You need to get used to working with PDF files and software that lets you do what you want to do with a minimum of fuss.

Adobe Acrobat 9 looks wonderful, and in a perfect world where all software was free, I would recommend using it. However, Acrobat Pro Extended costs around $700. Luckily, there are a number of third party applications that do a lot of the things that Acrobat does. I have created this guide to help you find the best software (or combination of software) to suit your needs (hopefully for free).

The benchmark: Acrobat
Adobe Acrobat now comes in three flavours: Standard, Pro, and Pro Extended. Each version introduces more features and is more expensive. Acrobat Pro Extended is the most powerful, feature rich PDF creation program in the world. However, ever since Acrobat 7, I feel that Adobe has introduced many features that have turned Acrobat into a bloated piece of software. I just want a program that makes beautiful PDFs, allows me to comment, markup, and organise my collection. Acrobat is hopeless when it comes to organising your PDF collection. You are better off using iTunes for PDF organisation! Bloated, overpriced, let's find an alternative.

Acrobat alternatives
Nitro PDF Professional - An Acrobat clone that tries to do everything that Acrobat does. At $US99, this is a good value alternative to Acrobat Pro for those who are serious about PDF creation and editing. Nitro PDF allows you to create, edit, comment, and annotate PDF files. You can also convert PDF files to other formats such as .doc, .rtf, .txt and so on. Nitro PDF is aimed at Microsoft Office users, desktop publishers or document management professionals. If you are considering buying it, here is a detailed review.

Foxit PDF Editor 2 - Lacks some of the features of the Acrobat alternatives mentioned in this article. It treats everything as images, so resizing a text box will distort the text. At $US99, you would be better off purchasing the superior Nitro PDF.

PDF Xchange Pro - An Acrobat clone that tries to do everything. You can edit, crop, markup, create PDFs. At $US70, it's cheaper than Nitro PDF.

PDF Converter 5 - Another Acrobat clone. Create PDFs, combine multiple files into a PDF, convert PDFs into other formats, annotate PDFs. Costs $US99.

PDF Fill PDF Editor 6 - Budget Acrobat alternative. $US20. Not sure how good it is. PDF creation looks questionable. Interface looks poor.

PDF Toolkits
PDF Tools - Manipulate the structure of PDF files. Merge, remove, rotate, crop pages. Free download.

PDF Transformer - A utility that creates OCR PDFs and converts PDF files back into Microsoft Office formats such as Word .doc and Excel .xls.

Free PDF printers
PDF Creator - Open source. Create PDF from multiple files. Extensive options for customising quality of PDF. Highly recommended.

Primo PDF - Create PDFs from multiple files.Embed fonts. Easy to use interface. This is my favourite free PDF printer.

Cute PDF - Free printer driver. Requires GhostScript to run.

doPDF - Free printer driver. Does not require GhostScript.

Free PDF viewers
Adobe Reader - A free download from Adobe's website. Very popular software that has become bloated in recent versions. The installer for Reader 9.0 is 33.5MB! There are faster and better alternatives.

Foxit PDF Reader - A popular Adobe Reader alternative. Loads very quickly. The installer is under 3MB! Better than Adobe viewer for viewing PDF files. Commenting features are limited in the free version.

PDF Xchange Viewer - I have mentioned PDF Xchange Viewer before. It is a fast PDF viewer that allows the user to markup, comment, highlight and annotate PDF files, which in my opinion makes it better than Foxit Reader. Every student should have a copy on their computer.

The ultimate (free) solution
I am not sure that there is a one-size-fits-all solution when it comes to working with PDFs. Obviously, Acrobat Pro Extended does it all, but costs a fortune. Unless if you are a high-level digital print professional, it is not worth the money.

When working with PDF files, you usually want to do three things:
  1. Create PDF files (and modify them by removing, rotating, cropping pages)
  2. View PDF files (and maybe print them on paper)
  3. Comment, highlight, markup a PDF
We can do all of these things using free software. 1. Primo PDF is the PDF printer driver that I recommend. It is free, easy to install, and creates high quality PDFs. 2. PDF Xchange viewer is the best PDF reader on the market. End of story. It is fast, and allows you to comment and markup PDFs. 3. PDF Tools is a free program that allows you to modify the structure of PDFs.

These three tools allow you to perform the most common functions that you would carry out in Acrobat... and they're free.
21 August 2008

High quality logos

Nothing looks worse than a poor quality logo on an expensive poster or a Powerpoint presentation for a conference. So,I have put together a bunch of high quality UWS and MARCS logos in a number of different combinations of colours. Download my logo pack.

14 August 2008

Fix uneven line spacing when using Doulos SIL for transcription

If you have ever transcribed speech using font such as Doulos SIL, you know how frustrating it can be when the line spacing changes in your document. You have a line of text that stands out and looks strange.

Doulos SIL includes characters with diacritics that require a looser line spacing than fonts such as Times New Roman. If the line spacing was like that in Times New Roman, many characters would be clipped.

However, there is a solution! The SIL fonts FAQ provides the answer.

By adjusting the line spacing in the word processor, such as Microsoft Word 2003, it is possible to assign the same line spacing value to all lines of text within a given style. In Word, select Format|Paragraph and set the line spacing to use the Exactly setting and specify a value more suited to your needs.

12 August 2008

Creating a thesis in Word: Formatting text

Most people use Word as if it is a typewriter. It's not. It's a word processor. Chances are that you use it as if it is a type writer too. It's ok. It's not your fault. No one teaches us how to use a word processor properly. Well, lets get started.

Using Styles and Formatting
A style is collection of numerous formatting options that are grouped together, given a name, and that may be applied to selections of text throughout your document. When we create a document, the formatting we use indicates different levels within our document. For example, headings may be size 14, bold, underlined and centred; subheadings may be size 12, bold and left aligned; and, body text may be size 12 and justified.

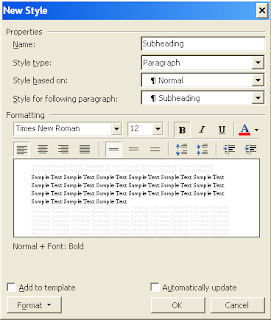
The Styles and Formatting pane is accessed by pressing this button on your toolbar or from the Format menu (keyboard shortcut: Alt+O+S). In addition to the default styles, you can create your own styles. Here is a screenshot of what my Subheading style might look like:Notice that I have selected size 12, bold and left alignment. More detailed formatting options can be specified by clicking the Format button in the bottom left corner (it's a shortcut to the Format menu including Font, Paragraph, Bullets and Numbering etc.). Clicking the Add to template checkbox will ensure that this style will appear in all new Word documents in the future (an easy to way to ensure consistency in the formatting of your documents).

Applying styles to text
The Styles and Formatting pane contains the existing styles available for your document. To apply a style, simply select the text in the document and click on the style in the task pane. The selected text on your document will change to reflect the formatting options of that style. You may repeatedly change the style applied to a selection of text by clicking on different style names. You can also make changes to a style after it has been applied to sections of text, and all of the sections of your document that have that style will update automatically. This allows you to change the formatting of large sections of your document quickly. For example, if I change the Subheading style above by clicking on the italicised text button, then all of text that I have applied the Subheading style to (presumably all of my subheadings) will automatically become italicised.

Never press Enter Enter to put a blank line between two paragraphs
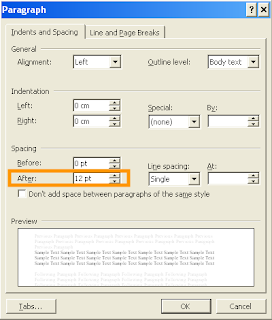
We are all guilty of this. It might be ok to press the Enter key twice if you are just creating a page that you want to quickly print out, however, this is not the way that you should separate paragraphs in your serious documents - especially your thesis. At the end of each paragraph, you should press the Enter key only once. To create a space between one paragraph and the next click on Paragraph in the Format menu. Increase the value of Spacing After so that it is greater than 0 point. In this case, there will be a 12 point space after my paragraph - when I press the Enter key. Of course, you can specify this as part of any style. Had I specified this for my Subheading style above, this would mean that all pieces of text that I apply the Subheading style to would also be followed by a 12 point space.

Stop getting frustrated at the one line of text that won't fit on the page
Word 2003 allows you to prevent individual lines from creeping over the page. In the Paragraph dialog (shown above), click on the Line and Page Breaks tab. Enabling Window/Orphan control prevents Word from printing the last line of a paragraph by itself at the top of a page (called window), or the first line of a paragraph by itself at the bottom of a page (called orphan).

Word also allows you to keep two paragraphs together on the same page. Use Keep With Next to keep one paragraph on the same page as the next paragraph.

31 July 2008

I want a browser like Mark

Long-time readers will know that Flock is my default web browser. It is based on Firefox, but has a few extra features that I find useful. Today, I deleted my profile and reinstalled everything. This is a log of what I did (for my future reference and also for those who keep asking me about what browser I use).
1. Set Options to the way I like them (Tools|Options)
Privacy: Keep cookies until I close Flock, Security: Do not remember passwords, Advanced: Search for text when I start typing, Network connection.

2. Make Google search the default straight from the location bar
Type about:config into the location bar.
Find keyword.URL.
Change the value to
http://www.google.com/search?ie=UTF-8&oe=UTF-8&sourceid=navclient&gfns=1&q=

3. Install addons (Tools|Addons)
Adblock Plus, AI Roboform Toolbar, Customize Google, Grab and Drag, IE Tab, Nuke Anything Enhanced, Zotero.

4. Import Zotero library (Windows Explorer)
Copy Zotero files and folders from backup to C:\Documents and Settings\username\Appication data\Flock\Browser\Profiles\randomstring.default\Zotero.

5. Log in to web services and click Remember Account
del.icio.us, Blogger, Facebook, Youtube, Gmail, Twitter, digg.

6. Customise UI
Add New Tab, Downloads buttons. Remove Roboform Toolbar from
Viewinstead, place Roboform button in between Photo Uploader button and Bookmarks Toolbar. Remove Adblock Plus button from view. Change Zotero button to Z.

7. Customise search engines (Search Preferences)
Wikipedia, Google Scholar, Google Images, Google Maps au, eBay au, Youtube, Amazon.

8. Add favorites to Favorites Toolbar
Gmail, Compose Mail, Scrybe, Flickr, Blogger.
9. Configure RSS Feeds (as specified by RSSFeeds tag in Favorites)

17 July 2008

Configure Zotero to work with Google Scholar

I love Zotero. It is my reference manager of choice. I have Endnote X, but no longer use it.

I just updated to Zotero 1.0.7 and received an error message when trying to import a citation from Google Scholar. I had not received such an error since the early beta releases of Zotero (I think 0.5). Luckily, I came up with a solution.

On the Google Scholar homepage, click on Preferences. Scroll to the bottom and tick Export to Endnote format, then click save. The error was then gone, and Zotero worked beautifully.

Zotero is a free download and is an addon for Mozilla Firefox and Flock.

29 June 2008

Notepad++: A guide to using regular expressions and extended search mode

The information in this post details how to clean up DMDX .zil files, allowing for easy importing into Excel. However, the explanations following each Find/Replace term will benefit anyone looking to understand how to use Notepad++ extended search mode and regular expressions.

If you are specifically looking for multiline regular expressions, look at this post.

You may already know that I am a big fan of Notepad++. Apparently, a lot of other people are interested in Notepad++ too. My introductory post on Notepad++ is the most popular post on my speechblog. I have a feeling that that is about to change.

Since the release of version 4.9, the Notepad++ Find and Replace commands have been updated. There is now a new Extended search mode that allows you to search for tabs(\t), newline(\r\n), and a character by its value (\o, \x, \b, \d, \t, \n, \r and \\). Unfortunately, the Notepad++ documentation is lacking in its description of these new capabilities. I found Anjesh Tuladhar's excellent slides on regular expressions in Notepad++ useful. After six hours of trial and error, I managed to bend Notepad++ to my will. And so I decided to post what I think is the most detailed step-by-step guide to Search and Replace in Notepad++, and certainly the most detailed guide to cleaning up DMDX .zil output files on the internet.

What's so good about Extended search mode?

One of the major disadvantages of using regular expressions in Notepad++ was that it did not handle the newline character well—especially in Replace. Now, we can use Extended search mode to make up for this shortcoming. Together, Extended and Regular Expression search modes give you the power to search, replace and reorder your text in ways that were not previously possible in Notepad++.

Search modes in the Find/Replace interface

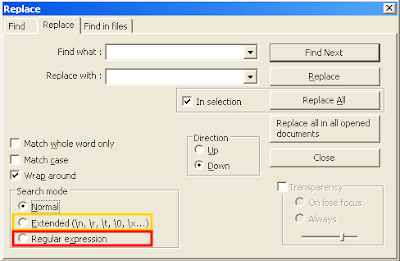
In the Find (Ctrl+F) and Replace (Ctrl+H) dialogs, the three available search modes are specified in the bottom right corner. To use a search mode, click on the radio button before clicking the Find Next or Replace buttons.

Cleaning up a DMDX .zil file

DMDX allows you to run experiments where the user responds by using the mouse or some other input device. Depending on the number of choices/responses (and of course the kind of task), DMDX will output a .zil file containing the results (instead of the traditional .azk file). This is specified in the header along with the various response options available to the participant. For some reason, DMDX outputs the reaction time twice—and on separate lines—in .zil files. Here's a guide for cleaning up these messy .zil files with Notepad++. Explanations of the Notepad++ search terms are provided in bullet points at the end of each step.

Step 1: Backup your original result file (e.g. yourexperiment.zil) and create a copy of that file (yourexperiment_copy.zil) that we will edit and clean up.

Step 2: Open yourexperiment_copy.zil in Notepad++ (version 4.9 or later).


Step 3: Remove all error messages.All lines containing DMDX error messages begin with an exclamation mark. Let's get rid of them.

Bring up the Replace dialog box (Ctrl+H) and select the Regular Expression search mode.

Find what: [!].*

Replace with: (leave this blank)

Press Replace All. All the error messages are gone.


  • [!] finds the exclamation character.

  • .* selects the rest of the line.

Step 4: Get rid of all these blank lines.

Switch to Extended search mode in the Replace dialog.

Find what: \r\n\r\n

Replace with: (leave this blank)

Press Replace All. All the blank lines are gone.


  • \r\n is a newline character (in Windows).

  • \r\n\r\n finds two newline characters (what you get from pressing Enter twice).


Step 5: Put each Item (DMDXspeak for trial) on a new line.

Switch to Regular Expression search mode.

Find what: (\+.*)(Item)

Replace with: \1\r\n\2

Press Replace All. "Item"s have been placed on new lines.


  • \+ finds the + character.

  • .* selects the text after the + up until the word "Item".

  • Item finds the string "Item".

  • () allow us to access whatever is inside the parentheses. The first set of parentheses may be accessed with \1 and the second set with \2.

  • \1\r\n\2 will take + and whatever text comes after it, will then add a new line, and place the string "Item" on the new line.

So far so good. Our aim now is to delete duplicate or redundant information (reaction time data).


Step 6: Remove all newline characters using Extended search mode, replacing them with a unique string of text that we will use as a signpost for redundant data later in RegEx. Choose a string of text that does not appear in you .zil file—I have chosen mork.

Switch to Extended search mode in the Replace dialog.

Find what: \r\n

Replace with: mork

Press Replace All. All the newline characters are gone. Your entire DMDX .zil file is now one very long line of (in my case word-wrapped) text.


Step 7: We're nearly there. Using our mork signpost keyword, let's separate the different RT values.

Stay in Extended search mode.

Find what: ,

Replace with: ,mork

Press Replace All. Now, mork appears after every comma.


Step 8: Let's put the remaining Items on new lines.

Switch to and stay in Regular Expression search mode for the remaining steps.

Find what: mork(Item)

Replace with: \r\n\1

Press Replace All. All "Item"s should now be on new lines.


Step 9: Let's get rid of those duplicate RTs.

Find what: mork ([^A-Za-z]*)mork [^A-Za-z]*\,mork

Replace with: \1,

Press Replace All. Duplicate reaction times are gone. It's starting to look like a result file :)


  • A-Z finds all letters of the alphabet in upper case.

  • a-z finds all lower case letters.

  • A-Za-z will find all alphabetic characters.

  • [^...] is the inverse. So, if we put these three together: [^A-Za-z] finds any character except an alphabetic character.

  • Notice that only one of the [^A-Za-z] is in parentheses (). This is recalled by \1 in the Replace with field. The characters outside of the parentheses are discarded.

Step 10: Let's get rid of all those morks.

Find what: mork

Replace with: (leave blank)

Press Replace All. The morks are gone.


Step 11: Separate each participant's data from the next.

Find what: (\**\*)

Replace with: \r\n\r\n\1\r\n\r\n

Press Replace All. The final product is a beautiful, comma-delimited .zil result file that is ready to be imported into Excel for further analysis.


Notepad++, is there anything it can't do?


Please post your questions in the comments below, rather than emailing me. This way, others can refer to my answers here, saving me many hours of responding to similar emails over and over.

Update 20/2/2009: Having trouble understanding regexp? I have created a new Guide for regular expressions. Check it out.

19 June 2008

Create conference posters: From Powerpoint to high quality PDF

Researchers often present their research findings at conferences using posters. When creating a poster, it is best to use software designed for laying out text and graphics onto a page, such as Adobe InDesign or even Illustrator. However, many PhD students and researchers do not have this software. Most use Powerpoint to create their posters. This post is a step-by-step guide to creating high quality A0 size print posters from Powerpoint.


How do I select A0 size?

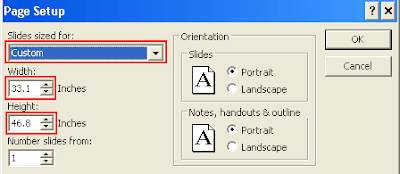
A0 size paper is about sixteen times larger than A4. Chances are that your printer doesn't print on A0 paper. Thankfully, there are a few ways around this. One way is to install a virtual A0 printer driver. However, the simplest method is to create a custom paper size. A0 paper is 841mm × 1189mm or 33.1 inches × 46.8 inches. Click on the File menu and select Page Setup. Select a Custom paper size and enter the dimensions.Note: Make sure to select Scale to fit paper on the Print dialog when printing any drafts of your poster to avoid wasting a lot of paper.


Converting to PDF. Do I have to? Yes.

Printers (the people not the machines) do not like Powerpoint files and you should avoid using them for printing. This is because Powerpoint is a presentation program, not a poster-making program. As such, Powerpoint does a poor job of embedding fonts, controlling the layout and preserving the colours. Text boxes tend to move around, graphs lose their labels, axes change size and so on.


So why do so many people create posters with Powerpoint?

Well, a lot of people have Office installed on their computers. Universities often provide Office for their research students and staff. Also, many people do not like using Powerpoint (or Office in general) but do so in order to share files and communicate with their supervisors and colleagues. What can I say, it's an imperfect world.


Printing to PDF

Once your poster is done and has been checked for any errors it is ready for printing. In order to print your poster on paper exactly the way it looks on your screen, you need to convert the Powerpoint file to a format that will embed the fonts and keep the text, images, graphs, tables and colours looking how you intended. For these reasons, we use PDF files.


I'm going to assume that you have access to Adobe Acrobat for the rest of this post (at MARCS, the Hotdesk computer has Acrobat). For those of you who do not have access to Acrobat, there are a number of free PDF printers that allow you to create PDF files from any Windows application: CutePDF, doPDF, PDFCreator and many more. Typically, these free PDF printers do not have all of the features that Acrobat has. Anyway, try printing your file to PDF and see how it turns out. If it looks perfect, then good for you. If it doesn't, then keep reading.


Why do my images look good in Powerpoint but crap in PDF?

This is because Acrobat (by default) downsamples the images to save file size. Let's fix that so that your PDF will look exactly like your Powerpoint file:


In Powerpoint, click on the Adobe PDF menu and click Change conversion settings.

Select the High Quality Print conversion setting and then click Advanced Settings...


Click on Images (on the left) and turn off all Downsampling and Compression.


Click OK to save your changes to the settings. Maybe save this new setting under the name Poster.


Now print your poster to PDF. Compare the PDF with your original Powerpoint version. Make sure that everything is where it should be. Once you have confirmed that everything looks good, send it off to the printer.

05 May 2008

Digsby: IM, email and social networking

If you have MSN/Windows Live Messenger, AIM, Yahoo Messenger, Google Talk or ICQ installed on your computer, you should uninstall them right now and replace them with Digsby.

Multiprotocol IM clients aren't new. Trillian, Miranda, Pidgin (formerly Gaim), Adium and Meebo have been around for a while. Digsby isn't just another multiprotocal IM client though.

Imagine a chat program that allows you to connect to all of the major IM networks: AIM, MSN, Yahoo, ICQ, Google Talk and Jabber. A program that allows you to combine a friend's multiple IDs from different networks into a single merged contact to eliminate duplicates in your buddy list. A program that notifies you of new email from all of your email accounts. A program that allows you to stay up-to-date with your social networking accounts on Facebook, Twitter or MySpace. That program is Digsby.

Digsby is a free chat program that does IM better than it has been ever done before. Beautifully simple, customisable and powerful, Digsby puts all of your accounts and contacts at your finger tips. Digsby is on the IM cutting edge. For example, Facebook rolled out Facebook Chat a few weeks ago. Within 5 days, Digsby rolled out an update allowing Facebook chat to integrate into Digsby just like any other IM network. No other IM client supports Facebook chat (yet).

Instant messaging
Digsby lets you do what you want: change your status for all your accounts, sign in to two accounts from the same service simultaneously (e.g. two different Google Talk accounts), have multiple chats in a tabbed conversation window, or drag important conversations into their own windows. Digsby is great because it lets you decide how you want it to behave.

Minimise the chat window and you will receive popup messages in the corner of your screen, notifying you of new IMs. You can reply directly into the popup - no need to re-open then re-minimise the chat window. Send your message and the popup will fade away, and you can continue working on what you were doing. If you want to, you can allow notifications to pop up even when using a full screen program, e.g. if you are viewing a Powerpoint presentation in fullscreen.

Email
You can manage your Gmail, Hotmail, Yahoo Mail, AOL Mail, even IMAP and POP3 accounts from Digsby.

Digsby can display popup email notifications from all of your configured accounts. Clicking a popup will launch a browser window, auto-log-you-in, and bring up the message.

Don't want to use a browser? No problem. At the bottom of the Digsby buddy list is the email InfoBox, which provides a preview of your unread messages, and allows you to perform actions such as mark as read, archive or report spam right from Digsby!
Digsby makes sending email easy too. You can compose and send emails directly from the conversation window. The email is sent directly from your account - as if you composed it in your browser.

Lets say you've configured your Gmail account in Digsby, and while typing up an email you realise that you want to add an attachment, or do something requiring your browser, simply hit the Edit in Gmail button and Digsby will launch the browser, log you in, and copy your text for you, pasting into the body of the compose window. Brilliant.

Social Networking
Digsby can notify you of everything happening on your Facebook, Twitter or MySpace account - and apparently other networks will be supported in future. You can receive friend requests, messages, group invites, new photo notifications, status updates, upcoming birthdays, and so on. You can even set and change your status from within Digsby.

Synchronisation
Do you use Digsby across multiple computers? No problem. Digsby will completely synchronise between computers. Log in to Digsby on a friend's computer using your Digsby id and password, and your settings, skins, fonts, colours, notification settings etc. will load automatically from the server. Log off and everything returns to how your friend had it.

Conclusion
I could go on and on about how good Digsby is, and I still wouldn't do it justice. Just install it and use it for yourself. After ten minutes, you'll see what I've been raving about.

Digsby raises the bar for mulit-protocol IM clients, and IM chat programs in general. It's features, power and the simplicity of the Digsby UI put it in a class of its own.

15 March 2008

Distraction free writing with Q10

Writing can be hard. This is especially true when you are working on a first draft. After reading a large body of literature, it can be hard to get your head around the big issues. This makes it hard to focus on your writing. Distractions such as email notifications, instant messaging, Facebook and Youtube do not help. You need to minimise distractions and start writing - get your thoughts out of your head and on to the screen in front of you. You can fix it up and edit it later. You need to get it out first.

Q10 is a full-screen text editor. Launching Q10 turns your entire screen black. Start typing and all that you will see in front of you is text, that is all. No notifications, no update requests, no firewall messages. Customise the text colour, font, size and spacing so that it is easy on the eyes.

Along the bottom of the screen is a thin ribbon that provides live text statistics such as word, page and character counts all of which are updated as you type. There is also a clock in the corner so that you can keep track of the time.

Q10 remembers the last file you worked on, meaning that you can pick up from where you left your work just by launching the program. Q10 also has a built in timer and alarm. Want to spend 30 minutes per day writing? No problem.

Importantly, Q10 is small, fast and stable. The filesize is less than 360KB.

Q10 is a free download.
Blogged with the Flock Browser

20 February 2008

Comment, markup and highlight PDF files with the free PDF-Xchange Viewer

As a researcher, you will collect and store an ever-increasing number of electronic journal articles (see my post on Managing a continuously growing journal article collection). Printing out hundreds of journal articles is time-consuming, costly, a waste of paper, and a storage nightmare. However, many researchers print out articles because they want to highlight important sections of an article, or scribble notes in the margins.

Adobe Acrobat allows the user to markup a PDF file in this fashion, however, it is quite expensive. Well, I'm happy to tell you that there is a free piece of software that allows the user to markup a PDF file in this fashion: PDF-Xchange Viewer.

PDF-Xchange Viewer allows you to highlight text, draw circles and other shapes, add sticky notes, strikeout and underline text.

PDF-Xchange Viewer is a free download.

Blogged with Flock