Update July 1, 2011: Dear users of PowerPoint 2010 and all users of PowerPoint on Mac OSX, due to popular demand, I have created a new post taking into account the limitations of newer versions of PowerPoint. Please refer to my new post on how to create high resolution images without PowerPoint. Users of PowerPoint 2003 and 2007 may use the techniques outlined below.
---------------------------------------------------
---------------------------------------------------
Not many people know that you can create journal quality, 300dpi, .tif images in PowerPoint. Well, you can.
By default, PowerPoint compresses images and saves them at 96dpi. For most users, this isn't a big deal, but if you are interested in printing the contents of your slides, for example, as a conference poster or as a figure in an academic journal, 96dpi isn't going to cut it.
What is dpi?
Dpi is an acronym for dots per inch, and is a measure of printing resolution. Generally speaking, the higher the dpi, the better the printing will come out.
Changing the dpi setting in PowerPoint
The trick to changing PowerPoint's dpi setting, is that you do not actually change it in PowerPoint.
1. Select Run from the Start menu.
2. Type regedit into the Run box, and then click OK.
3. Once the Registry Editor has opened, navigate your way to the registry key for PowerPoint. This will depend on which version of PowerPoint you are using.
PowerPoint 2003: HKEY_CURRENT_USER\Software\Microsoft\Office\11.0\PowerPoint\Options
PowerPoint 2007: HKEY_CURRENT_USER\Software\Microsoft\Office\12.0\PowerPoint\Options
4. Select Options by clicking on it once, and then click the Edit menu, then New and then DWORD Value.
5. Type ExportBitmapResolution, and then press ENTER.
6. Select ExportBitmapResolution, and click on Modify on the Edit menu.
7. In the Value data box, type your desired resolution value: 300, then click Decimal (the value will change to 768), and then click OK.
8. Exit the Registry Editor.
Saving a high resolution image in PowerPoint
To save an image, you simply export a PowerPoint slide as a picture.
1. Have the slide that you want to export open.
2. Select Save As from the File menu.
3. In the Save as dialog, select the type of file that you want to export your slide as (.gif, .jpg, .png, .tif, .bmp, .wmf or .emf), and then click Save.
Why use PowerPoint to create images at all?
As I've mentioned before, a lot of people have Office installed on their computers, and universities often provide Office for their research students and staff. Because of its large user base, researchers often crunch their numbers and create their figures in Excel. Importing an Excel chart into PowerPoint is as easy as copy-pasting, and you may then save the figure as a high resolution tiff image, as outlined above.
PowerPoint provides another advantage, which is the reason that many conference posters are created in ppt format. The file may be saved as in native PowerPoint format, preserving the different objects. Need to insert a bigger arrow? No problem. Need to change the font size? Piece of cake. The advantage afforded by PowerPoint is its simplicity. It's easy to send the file to a collaborator, changes can be made, and comments inserted in text boxes.
Further readingUsing PowerPoint to Create High-Resolution Images for Journal Publications

16 November 2009
07 September 2009
Zotero: Book titles are capitalised in my APA reference list when they shouldn't be! Fix it
As I've mentioned before, I am a big fan of Zotero. It is one of those pieces of software that you love more and more the more you use it. I've already shown you how to remove the issue number from appearing in your APA reference list. In this post, we're going to tackle incorrect capitalisation in book titles. The APA Publication Manual specifies that book titles should be sentence case and in italics.
Most of the time, Zotero handles this without a hitch. But sometimes, the title of a book Appears In Capitals, which is not consistent with APA formatting. Why does this occur? Well, there are a few potential reasons, and rather than going through them all, I will instead share with you my foolproof method for making sure that book titles display the way that they should. Always.
Let's start at the beginning
First things first. When importing a reference into Zotero, format it so that the capitalisation is correct. Zotero is a clever program, but it does not know if any words within a book title should be capitalised, for example, the name of a country, a language, or a word following a colon. Here's an example that has all of these:
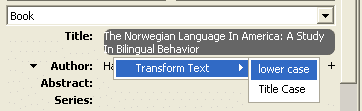
Haugen, E. (1953). The Norwegian language in America: A study in bilingual behavior. Bloomington: Indiana University Press.
As you can see, four words need to be capitalised: The, Norwegian, America, A. But when I imported this into Zotero from an online database, all of the words were capitalised. We need to fix this so that only the necessary words are capitalised. You can (a) go through and do it by hand, or (b) right-click on the book title in Zotero and select Transform Text | lowercase.
 Now, all of the text will be in lowercase. Simply go through and capitalise the appropriate words manually. Easy.
When you cite Haugen's book in text, the full reference will appear in your reference list with the appropriate capitalisation. But, some people have complained in the Zotero forums that every word in the book title is capitalised in the reference list, even when they have manually corrected the capitalisation within Zotero.
Now, there might be more than one reason for this, but I have only come across one so far. When entering citations into a document, the reference will normally occur within parentheses at the end of a sentence.
For example, there are Norwegian bilinguals in America (Haugen, 1953).
This usage will not cause Zotero (and you) too many headaches. But sometimes, you will add some information within the parentheses because you have not gone into all of the details in your own writing.
For example, The number of Norwegian bilinguals in America is increasing (see Haugen, 1953).
The potential problem here is how you insert the word see, or any prefix for that matter. The wrong way to do this is to click Show Editor and to manually add the text.
 The wrong way
Using the editor to insert the word see in this way may result in capitalised text in your book title in the reference list. Instead, what you should do is click on the Prefix field and type in the word see there.
 The right way
If you want to type (see Haugen, 1953 for an excellent review), then you would enter see as the Prefix and for an excellent review as the Suffix. This will make sure that the book title in the reference list will be capitalised as you intended.
Easy, no?
Zotero: How to hide the journal issue number in an APA format reference list
I've been a big fan of Zotero for a long time. I'm currently using version 2.0b6.5, which is wonderful, and the Zotero forums are generally helpful, but there is one problem that I have come across now that I am finishing off the thesis: Zotero by default includes the issue number of a journal in the reference list. Now, I know what you're thinking. Who cares, right? Well, if you're thinking that then you are probably in the wrong place. Thesis examiners, journal reviewers and editors, conference reviewers all care. As an academic, having a properly formatted reference list is of paramount importance. A well-formatted reference list makes a good impression on your reviewer. An incorrectly formatted list... well you get the point.
Zotero is capable of formatting references in a variety of styles. One of the most popular is that of the American Psychological Association (APA), used in psychology and the humanities. According to the 5th edition of the APA Style Manual, "If, and only if, each issue of a journal begins on page 1, give the issue number in parentheses immediately after the volume number" (pp. 227). This means that 95% of the time, the issue number should not appear. So how do you get rid of it?
Well, Zotero has a .csl file for each of its styles, containing code that specifies what information should appear in the reference list and how it should be formatted. To make the issue numbers disappear, you simply remove the code that inserts the issue number into the reference list.
Finding the style file
The style files are located in the Zotero directory, C:\Documents and Settings\YourUserName\Application Data\YourBrowser\Browser\Profiles\xxxxxxxx.default\zotero\styles\. I have written YourUserName because yours will be different to mine, and YourBrowser because Zotero is compatible with any Firefox-based browser, so for most people this will be Firefox, but for others it will be Flock, and so on.
Removing the issue number
Open the apa.csl file andFind the issue number code and delete it (hint: it's right after the volume number code that you should leave untouched).
Update 18/07/2012: As tends to happen when new versions come out, the advice above will not work for newer versions of Zotero. You still open apa.csl with a text editor, but now find and delete the following text:
"text variable="issue" prefix="(" suffix=")"
on line 310.
Here's one we prepared earlier
To make this easy for those of you who aren't tech savvy, I have made my apa.csl file available for download (compatible with Zotero 3.0.8). Just copy it to your Styles folder and overwrite the existing file.
Zotero is capable of formatting references in a variety of styles. One of the most popular is that of the American Psychological Association (APA), used in psychology and the humanities. According to the 5th edition of the APA Style Manual, "If, and only if, each issue of a journal begins on page 1, give the issue number in parentheses immediately after the volume number" (pp. 227). This means that 95% of the time, the issue number should not appear. So how do you get rid of it?
Well, Zotero has a .csl file for each of its styles, containing code that specifies what information should appear in the reference list and how it should be formatted. To make the issue numbers disappear, you simply remove the code that inserts the issue number into the reference list.
Finding the style file
The style files are located in the Zotero directory, C:\Documents and Settings\YourUserName\Application Data\YourBrowser\Browser\Profiles\xxxxxxxx.default\zotero\styles\. I have written YourUserName because yours will be different to mine, and YourBrowser because Zotero is compatible with any Firefox-based browser, so for most people this will be Firefox, but for others it will be Flock, and so on.
Removing the issue number
Open the apa.csl file and
Update 18/07/2012: As tends to happen when new versions come out, the advice above will not work for newer versions of Zotero. You still open apa.csl with a text editor, but now find and delete the following text:
"text variable="issue" prefix="(" suffix=")"
on line 310.
Here's one we prepared earlier
To make this easy for those of you who aren't tech savvy, I have made my apa.csl file available for download (compatible with Zotero 3.0.8). Just copy it to your Styles folder and overwrite the existing file.
18 June 2009
Import high quality, high resolution images and figures (charts) into Word
A few weeks ago, Chris Davis gave an excellent MMM on producing high quality tables and figures. Most journals ask you to provide the figures and tables as separate files. They have professional page-layout people that take care of this stuff. However, students creating a PhD thesis (or a Masters thesis for that matter) have to tackle this problem on their own.
So what's the problem? Well, by default, Word downsamples (compresses) images that you paste into your documents. It does this to keep the filesize of your .doc file as small as possible. This is because once upon a time people used 1.44 MB floppy disks to transport their files. Amazingly, there are still people alive that want to compress their images in Word (more than the default).
Thankfully, there is way to insert beautiful, crisp images into Word. Click on the Tools menu, and select Options. Once the Options box appears, click the General tab and then the Web options button. In the Web options box, click the Pictures tab. Change the Pixels per inch value from the default (72) to 300 (or whatever your requirements are).
A word of warning: After having set this value, do not assume that it will stay there. This value resets to 72 dpi unpredictably and without warning. My advice is to check this setting before inserting an imporant image or figure. Don't worry about it changing without you knowing. If it reverts to 72 dpi, when you insert an image it will look awful, which should make alarm bells ring.
21 April 2009
The Healthy Laptop MMM presentation
Yesterday, I gave a talk about setting up a laptop for work. The talk covered turning off useless Windows services, security, and also contained a few recommendations for what programs I think should come with every MARCS laptop. Frequent visitors of this blog will probably already know most of the things outlined in the slides, as some information comes from posts that are two years old. However, the info is as true today as it was the day I originally wrote the posts. In any case, I have made the slides from yesterday's talk available for download here. I designed the presentation according to Seth Godin's excellent presentation style and advice re: slide design in Powerpoint. There are two slides that I am not entirely happy with, but overall, it's a good presentation.
20 February 2009
Rearrange text using multiline regular expressions in Emacs
My previous posts on Notepad++ and regular expressions have become very popular. In particular, readers have posed many questions along the lines of "how do I write a regular expression that will..." After having read this post you should be an intermediate regular expression creator. Let's get started.
While I am a fan of Notepad++, it is not powerful enough to perform the regular expressions that I will be going through in this post. I strongly recommend that you download and use the excellent (and free) XEmacs. Installing XEmacs is not as simple as it could be. To simplify the process, I have made my Config files available for download here. Instructions are included.
Regular expression you say, what exactly is a regular expression?
Think of a regular expression as a fancy Find+Replace command that can span across multiple lines and can rearrange bits of text. Using regular expressions involves two steps:
1. Create a search term that finds and selects only the text that you want to modify/move/delete.
2. Create a replace term that outputs the desired text in the correct way.
This is a bit vague, isn't it. Let's look at our first example.
Example 1. Manipulating a simple list of names using Find+Replace
I got married on 11 October (a few months ago) and the photographer gave us a DVD containing all of the photos, approximately 1350 JPEG files. My wife and I were told to choose 120 of these photos to be printed for our wedding album. The DVD contained two folders named 'A' and 'B'. Folder A contained files named DSC_0001 through to DSC_1000, and folder B contained files named DSC_0001 through to DSC_0350. The reason for the existence of two folders was that they came from two memory cards. A thousand photos were taken on card A, which got full, and then a further 350 photos were taken on card B. Now, the problem is that we have 350 overlapping filenames. So we need to change the filenames in some way to make them unique and identifiable. This is relatively easy. Here is what we did.
First, we chose 120 photos. 105 came from folder A. I copied the filenames of the chosen photos from folder A and pasted them into a new text file. It looked like this:
DSC_0004.jpeg
DSC_0007.jpeg
DSC_0015.jpeg
(and so on....)
DSC_0997.jpeg
Before moving on to adding filenames from folder B, I performed a simple find and replace.
Find: DSC_
Replace with: DSCa_
This made the text look like this:
DSCa_0004.jpeg
DSCa_0007.jpeg
DSCa_0015.jpeg
(and so on....)
DSCa_0997.jpeg
We then pasted the filenames from folder B (in pink) into the text file:
DSCa_0004.jpeg
DSCa_0007.jpeg
DSCa_0015.jpeg
(and so on....)
DSCa_0997.jpeg
I then changed the newly pasted names using a simple Find and Replace term:
Find: DSC_
Replace with: DSCb_
That made our text look like this:
DSCa_0004.jpeg
DSCa_0007.jpeg
DSCa_0015.jpeg
(and so on....)
DSCa_0997.jpeg
DSCb_0002.jpeg
DSCb_0004.jpeg
DSCb_0011.jpeg
DSCb_0015.jpeg
(etc.)
This made each file unique and identifiable. I also removed the .jpeg extension to minimise the possibility of confusion.
DSCa_0004
DSCa_0007
DSCa_0015
(and so on....)
DSCa_0997
DSCb_0002
DSCb_0004
DSCb_0011
DSCb_0015
(etc.)
Of course, I could have renamed the filenames in many different ways. For example, I could have changed DSC_0004.jpeg to A\DSC_004, or A_004, or FolderA_004, and so on. The name is not important. What is important is that the names are uniquely identifiable, meaning that no two names are alike. Now, our photographer will not get confused between which DSC_0004.jpeg we want (the one from folder A or B). This is the end of our simple Find+Replace exercise. Let's have a go at a regular expression.
Example 2. A simple Regular Expression: Removing newlines and replacing them with commas
Let's cover some Regular Expression basics. A Regular Expression is used to search for text with a similar pattern, that is, text that matches the search criteria. What makes Regular Expressions so powerful is that there isn't a one-to-one mapping between the regular expression and the text (as there would be in a simple Find+Replace). For example, a period or full stop character . matches any character. So searching for DSC. (note: that is DSC followed by a full stop) would select both DSCa and DSCb, as the full stop could be any character.
Find+Replace is a useful tool. However, there are certain tasks that go beyond the capabilities of simple Find+Replace. Let's assume that we have the list of photos from above.
DSCa_0004
DSCa_0007
DSCa_0015
DSCa_0997
DSCb_0002
DSCb_0004
DSCb_0011
DSCb_0015
I don't want to leave this list as it is (one filename on each line). I want to place the files all on the same line, separated by a comma. This would be the regexp:
Find: newline
Replace with: ,
Note: You do not actually type in the word newline. When we type, every time the Return or Enter key is pressed, a newline character or carriage return is placed on the page (even if you cannot see it on the screen). Given that our filenames above occur on separate lines, there is a newline character after the final digit on each line. To further complicate matters, there are different types of newline characters. Most text editors have a hard time dealing with newline characters (it is precisely for this reason that I have switched from Notepad++ to XEmacs). XEmacs is quite excellent at handling them with minimum fuss. To enter a newline character into your Regular Expression, type Control+Q Control+J, represented in XEmacs as C - q, C - j.
Executing this regexp results in:
DSCa_0004,DSCa_0007,DSCa_0015,DSCa_0997,DSCb_0002,DSCb_0004,DSCb_0011,DSCb_0015
Example 3. A more complex example: Rearranging groups of text onto the same line
Let's assume that my wife went through the list of photos and wrote instructions to the photographer under each name, making the list look like this:
DSCa_0004
Print this one 6*4
DSCa_0007
Print this one 5*7
DSCa_0015
Print this on canvas
DSCa_0997
Print this 6*4
DSCb_0002
Print this one 8*10
DSCb_0004
Can you print this one in matte
DSCb_0011
Make 3 copies of this one
DSCb_0015
Print this one 6*4
I think that the best way to make this clear for the photographer would be to rearrange the text so that it looks like this:
DSCa_0004 = Print this one 6*4
DSCa_0007 = Print this one 5*7
(and so on....)
In order to make the correct regular expression, we must first identify the correct pattern in the text. We cannot simply replace all the newlines as we did in Example 2, because then every photo and comment would be on one very long line. We must place some unique characteristic into our regular expression that will discriminate between which two lines belong together and which do not. In this case, one possibility is by taking advantage of the fact that all photo filenames begin with D, the comments for that photo are on the line immediately below, and no comments begin with D. The regexp would look like this:
Find: \(D.*\) C-q C-j
Replace with: \1 =
Let's examine this regexp. D searches for the letter D. The full stop "." searches for any character. The asterisk after the full stop allows for recursion, meaning that we are searching for any characters after D. The slash and parenthesis around the D.* allow us to save the contents of the regexp and manipulate it in the replace term. The line break, represented by the Ctrl+Q Ctrl+J keyboard command is outside the slashes and parentheses and is discarded.
The replace term takes the D.* (effectively the filename, which is enclosed in slash+parentheses in the search term), adds a space, then an equals sign, then a space. This produces the following output:
DSCa_0004 = Print this one 6*4
DSCa_0007 = Print this one 5*7
DSCa_0015 = Print this on canvas
DSCa_0997 = Print this 6*4
DSCb_0002 = Print this one 8*10
DSCb_0004 = Can you print this one in matte
DSCb_0011 = Make 3 copies of this one
DSCb_0015 = Print this one 6*4
Example 4. An even trickier example: Rearranging groups of text onto the same line 2
Let's assume that my wife wrote instructions to the photographer under each name, however, some comments began with a D. The list looks like this:
DSCa_0004
Do you think you could print this one 6*4
DSCa_0007
Print this one 5*7
DSCa_0015
Do this on canvas
DSCa_0997
Dave, print this 6*4
DSCb_0002
Print this one 8*10
DSCb_0004
Can you print this one in matte
DSCb_0011
Make 3 copies of this one
DSCb_0015
Print this one 6*4
This time, we cannot use the previous regexp as it does not identify only the photo filenames. It will also select the comments beginning with D. Using the regexp from Example 3 in this case will result in this:
DSCa_0004 = Do you think you could print this one 6*4 = DSCa_0007 = Print this one 5*7
DSCa_0015 = Do this on canvas = DSCa_0997 = Dave, print this 6*4 = DSCb_0002 = Print this one 8*10
DSCb_0004 = Can you print this one in matte
DSCb_0011 = Make 3 copies of this one
DSCb_0015 = Print this one 6*4
It is a mess. We need to find a pattern in the text that uniquely identifies the filenames only and not the comments. Look at the filenames. All begin with DSC. So, we could change the regexp to find DSC or even DS. No comments begin with DS. Let's give it a shot.
Find: \(DS.*\) C-q C-j
Replace with: \1 =
And here's the output:
DSCa_0004 = Do you think you could print this one 6*4
DSCa_0007 = Print this one 5*7
DSCa_0015 = Do this on canvas
DSCa_0997 = Dave, print this 6*4
DSCb_0002 = Print this one 8*10
DSCb_0004 = Can you print this one in matte
DSCb_0011 = Make 3 copies of this one
DSCb_0015 = Print this one 6*4
Easy. We could have used \(DSC.*\) as the search term and the result would have been the same.
Example 5. Getting rid of unwanted information.
Let's assume that the photographer receives our list of photos. He wants to see which photos we want to print in what sizes, but he also wants to leave the descriptions for files where no size has been specified. Using regexp, we can remove all info other than the sizes. Here's the file:
DSCa_0004 = Do you think you could print this one 6*4
DSCa_0007 = Print this one 5*7
DSCa_0015 = Do this on canvas
DSCa_0997 = Dave, print this 6*4
DSCb_0002 = Print this one 8*10
DSCb_0004 = Can you print this one in matte
DSCb_0011 = Make 3 copies of this one
DSCb_0015 = Print this one 6*4
The unique thing that identifies the comments that contains sizes is the asterisk character in the dimensions. We want to keep the asterisk as well as the characters immediately before and after the asterisk (the numbers). And here is the regexp:
Find: \(= \).*\(.\*.\)
Replace with: \1\2
This is the output:
DSCa_0004 = 6*4
DSCa_0007 = 5*7
DSCa_0015 = Do this on canvas
DSCa_0997 = 6*4
DSCb_0002 = 8*10
DSCb_0004 = Can you print this one in matte
DSCb_0011 = Make 3 copies of this one
DSCb_0015 = 6*4
As you can see, only lines conatining sizes have had their comments removed. Let's go through the search term. The \(= \) searches for the equals sign followed by a space (which denotes where comments begin) and stores it in \1. All text thereafter .* is not kept, until we come across \(.\*.*\) this pattern which is stored in \2. Let's unpack the \(.\*.*\) final part of the search. The first full stop searches for any character, the \* searches for the asterisk (note: the slash before the asterisk is essential as it specifies that we are searching for an asterisk * character, and not a recursive .*), and the last full stop and asterisk allows any character after the asterisk.
Example 6: Rearranging information.
Our photographer has decided that he would like to display the sizes of our photos on the left and the filenames on the right of the equals sign. Photos containing comments only should remain as they are. Here is the text:
DSCa_0004 = 6*4
DSCa_0007 = 5*7
DSCa_0015 = Do this on canvas
DSCa_0997 = 6*4
DSCb_0002 = 8*10
DSCb_0004 = Can you print this one in matte
DSCb_0011 = Make 3 copies of this one
DSCb_0015 = 6*4
Again the asterisk is our unique identifier of the sizes. Here is the regexp:
Find: \(.*\)\(= \)\(.\*.*\)
Replace with: \3 \2\1
And here is the output:
6*4 = DSCa_0004
5*7 = DSCa_0007
DSCa_0015 = Do this on canvas
6*4 = DSCa_0997
8*10 = DSCb_0002
DSCb_0004 = Can you print this one in matte
DSCb_0011 = Make 3 copies of this one
6*4 = DSCb_0015
Our photographer could have done this at the beginning of Example 5 (if he wanted to). Here is the text from Example 5:
DSCa_0004 = Do you think you could print this one 6*4
DSCa_0007 = Print this one 5*7
DSCa_0015 = Do this on canvas
DSCa_0997 = Dave, print this 6*4
DSCb_0002 = Print this one 8*10
DSCb_0004 = Can you print this one in matte
DSCb_0011 = Make 3 copies of this one
DSCb_0015 = Print this one 6*4
And here is the regular expression that will (a) get rid of all info apart from sizes, and (b) rearrange the order of the text to size = filename:
Find: \(.*\)\(= \).*\(.\*.*\)
Replace with: \3 \2\1
And here is the output:
6*4 = DSCa_0004
5*7 = DSCa_0007
DSCa_0015 = Do this on canvas
6*4 = DSCa_0997
8*10 = DSCb_0002
DSCb_0004 = Can you print this one in matte
DSCb_0011 = Make 3 copies of this one
6*4 = DSCb_0015
As you can see, the two outputs are identical.
These are only a few examples of how regular expressions can be used. I hope that these examples will be useful for you and will provide some guidance and stimulation about what is possible with regexp. If you have any questions, please post them in the comments below.
While I am a fan of Notepad++, it is not powerful enough to perform the regular expressions that I will be going through in this post. I strongly recommend that you download and use the excellent (and free) XEmacs. Installing XEmacs is not as simple as it could be. To simplify the process, I have made my Config files available for download here. Instructions are included.
Regular expression you say, what exactly is a regular expression?
Think of a regular expression as a fancy Find+Replace command that can span across multiple lines and can rearrange bits of text. Using regular expressions involves two steps:
1. Create a search term that finds and selects only the text that you want to modify/move/delete.
2. Create a replace term that outputs the desired text in the correct way.
This is a bit vague, isn't it. Let's look at our first example.
Example 1. Manipulating a simple list of names using Find+Replace
I got married on 11 October (a few months ago) and the photographer gave us a DVD containing all of the photos, approximately 1350 JPEG files. My wife and I were told to choose 120 of these photos to be printed for our wedding album. The DVD contained two folders named 'A' and 'B'. Folder A contained files named DSC_0001 through to DSC_1000, and folder B contained files named DSC_0001 through to DSC_0350. The reason for the existence of two folders was that they came from two memory cards. A thousand photos were taken on card A, which got full, and then a further 350 photos were taken on card B. Now, the problem is that we have 350 overlapping filenames. So we need to change the filenames in some way to make them unique and identifiable. This is relatively easy. Here is what we did.
First, we chose 120 photos. 105 came from folder A. I copied the filenames of the chosen photos from folder A and pasted them into a new text file. It looked like this:
DSC_0004.jpeg
DSC_0007.jpeg
DSC_0015.jpeg
(and so on....)
DSC_0997.jpeg
Before moving on to adding filenames from folder B, I performed a simple find and replace.
Find: DSC_
Replace with: DSCa_
This made the text look like this:
DSCa_0004.jpeg
DSCa_0007.jpeg
DSCa_0015.jpeg
(and so on....)
DSCa_0997.jpeg
We then pasted the filenames from folder B (in pink) into the text file:
DSCa_0004.jpeg
DSCa_0007.jpeg
DSCa_0015.jpeg
(and so on....)
DSCa_0997.jpeg
DSC_0002.jpeg
DSC_0004.jpeg
DSC_0011.jpeg
DSC_0015.jpeg
(etc.)
I then changed the newly pasted names using a simple Find and Replace term:
Find: DSC_
Replace with: DSCb_
That made our text look like this:
DSCa_0004.jpeg
DSCa_0007.jpeg
DSCa_0015.jpeg
(and so on....)
DSCa_0997.jpeg
DSCb_0002.jpeg
DSCb_0004.jpeg
DSCb_0011.jpeg
DSCb_0015.jpeg
(etc.)
This made each file unique and identifiable. I also removed the .jpeg extension to minimise the possibility of confusion.
DSCa_0004
DSCa_0007
DSCa_0015
(and so on....)
DSCa_0997
DSCb_0002
DSCb_0004
DSCb_0011
DSCb_0015
(etc.)
Of course, I could have renamed the filenames in many different ways. For example, I could have changed DSC_0004.jpeg to A\DSC_004, or A_004, or FolderA_004, and so on. The name is not important. What is important is that the names are uniquely identifiable, meaning that no two names are alike. Now, our photographer will not get confused between which DSC_0004.jpeg we want (the one from folder A or B). This is the end of our simple Find+Replace exercise. Let's have a go at a regular expression.
Example 2. A simple Regular Expression: Removing newlines and replacing them with commas
Let's cover some Regular Expression basics. A Regular Expression is used to search for text with a similar pattern, that is, text that matches the search criteria. What makes Regular Expressions so powerful is that there isn't a one-to-one mapping between the regular expression and the text (as there would be in a simple Find+Replace). For example, a period or full stop character . matches any character. So searching for DSC. (note: that is DSC followed by a full stop) would select both DSCa and DSCb, as the full stop could be any character.
Find+Replace is a useful tool. However, there are certain tasks that go beyond the capabilities of simple Find+Replace. Let's assume that we have the list of photos from above.
DSCa_0004
DSCa_0007
DSCa_0015
DSCa_0997
DSCb_0002
DSCb_0004
DSCb_0011
DSCb_0015
I don't want to leave this list as it is (one filename on each line). I want to place the files all on the same line, separated by a comma. This would be the regexp:
Find: newline
Replace with: ,
Note: You do not actually type in the word newline. When we type, every time the Return or Enter key is pressed, a newline character or carriage return is placed on the page (even if you cannot see it on the screen). Given that our filenames above occur on separate lines, there is a newline character after the final digit on each line. To further complicate matters, there are different types of newline characters. Most text editors have a hard time dealing with newline characters (it is precisely for this reason that I have switched from Notepad++ to XEmacs). XEmacs is quite excellent at handling them with minimum fuss. To enter a newline character into your Regular Expression, type Control+Q Control+J, represented in XEmacs as C - q, C - j.
Executing this regexp results in:
DSCa_0004,DSCa_0007,DSCa_0015,DSCa_0997,DSCb_0002,DSCb_0004,DSCb_0011,DSCb_0015
Example 3. A more complex example: Rearranging groups of text onto the same line
Let's assume that my wife went through the list of photos and wrote instructions to the photographer under each name, making the list look like this:
DSCa_0004
Print this one 6*4
DSCa_0007
Print this one 5*7
DSCa_0015
Print this on canvas
DSCa_0997
Print this 6*4
DSCb_0002
Print this one 8*10
DSCb_0004
Can you print this one in matte
DSCb_0011
Make 3 copies of this one
DSCb_0015
Print this one 6*4
I think that the best way to make this clear for the photographer would be to rearrange the text so that it looks like this:
DSCa_0004 = Print this one 6*4
DSCa_0007 = Print this one 5*7
(and so on....)
In order to make the correct regular expression, we must first identify the correct pattern in the text. We cannot simply replace all the newlines as we did in Example 2, because then every photo and comment would be on one very long line. We must place some unique characteristic into our regular expression that will discriminate between which two lines belong together and which do not. In this case, one possibility is by taking advantage of the fact that all photo filenames begin with D, the comments for that photo are on the line immediately below, and no comments begin with D. The regexp would look like this:
Find: \(D.*\) C-q C-j
Replace with: \1 =
Let's examine this regexp. D searches for the letter D. The full stop "." searches for any character. The asterisk after the full stop allows for recursion, meaning that we are searching for any characters after D. The slash and parenthesis around the D.* allow us to save the contents of the regexp and manipulate it in the replace term. The line break, represented by the Ctrl+Q Ctrl+J keyboard command is outside the slashes and parentheses and is discarded.
The replace term takes the D.* (effectively the filename, which is enclosed in slash+parentheses in the search term), adds a space, then an equals sign, then a space. This produces the following output:
DSCa_0004 = Print this one 6*4
DSCa_0007 = Print this one 5*7
DSCa_0015 = Print this on canvas
DSCa_0997 = Print this 6*4
DSCb_0002 = Print this one 8*10
DSCb_0004 = Can you print this one in matte
DSCb_0011 = Make 3 copies of this one
DSCb_0015 = Print this one 6*4
Example 4. An even trickier example: Rearranging groups of text onto the same line 2
Let's assume that my wife wrote instructions to the photographer under each name, however, some comments began with a D. The list looks like this:
DSCa_0004
Do you think you could print this one 6*4
DSCa_0007
Print this one 5*7
DSCa_0015
Do this on canvas
DSCa_0997
Dave, print this 6*4
DSCb_0002
Print this one 8*10
DSCb_0004
Can you print this one in matte
DSCb_0011
Make 3 copies of this one
DSCb_0015
Print this one 6*4
This time, we cannot use the previous regexp as it does not identify only the photo filenames. It will also select the comments beginning with D. Using the regexp from Example 3 in this case will result in this:
DSCa_0004 = Do you think you could print this one 6*4 = DSCa_0007 = Print this one 5*7
DSCa_0015 = Do this on canvas = DSCa_0997 = Dave, print this 6*4 = DSCb_0002 = Print this one 8*10
DSCb_0004 = Can you print this one in matte
DSCb_0011 = Make 3 copies of this one
DSCb_0015 = Print this one 6*4
It is a mess. We need to find a pattern in the text that uniquely identifies the filenames only and not the comments. Look at the filenames. All begin with DSC. So, we could change the regexp to find DSC or even DS. No comments begin with DS. Let's give it a shot.
Find: \(DS.*\) C-q C-j
Replace with: \1 =
And here's the output:
DSCa_0004 = Do you think you could print this one 6*4
DSCa_0007 = Print this one 5*7
DSCa_0015 = Do this on canvas
DSCa_0997 = Dave, print this 6*4
DSCb_0002 = Print this one 8*10
DSCb_0004 = Can you print this one in matte
DSCb_0011 = Make 3 copies of this one
DSCb_0015 = Print this one 6*4
Easy. We could have used \(DSC.*\) as the search term and the result would have been the same.
Example 5. Getting rid of unwanted information.
Let's assume that the photographer receives our list of photos. He wants to see which photos we want to print in what sizes, but he also wants to leave the descriptions for files where no size has been specified. Using regexp, we can remove all info other than the sizes. Here's the file:
DSCa_0004 = Do you think you could print this one 6*4
DSCa_0007 = Print this one 5*7
DSCa_0015 = Do this on canvas
DSCa_0997 = Dave, print this 6*4
DSCb_0002 = Print this one 8*10
DSCb_0004 = Can you print this one in matte
DSCb_0011 = Make 3 copies of this one
DSCb_0015 = Print this one 6*4
The unique thing that identifies the comments that contains sizes is the asterisk character in the dimensions. We want to keep the asterisk as well as the characters immediately before and after the asterisk (the numbers). And here is the regexp:
Find: \(= \).*\(.\*.\)
Replace with: \1\2
This is the output:
DSCa_0004 = 6*4
DSCa_0007 = 5*7
DSCa_0015 = Do this on canvas
DSCa_0997 = 6*4
DSCb_0002 = 8*10
DSCb_0004 = Can you print this one in matte
DSCb_0011 = Make 3 copies of this one
DSCb_0015 = 6*4
As you can see, only lines conatining sizes have had their comments removed. Let's go through the search term. The \(= \) searches for the equals sign followed by a space (which denotes where comments begin) and stores it in \1. All text thereafter .* is not kept, until we come across \(.\*.*\) this pattern which is stored in \2. Let's unpack the \(.\*.*\) final part of the search. The first full stop searches for any character, the \* searches for the asterisk (note: the slash before the asterisk is essential as it specifies that we are searching for an asterisk * character, and not a recursive .*), and the last full stop and asterisk allows any character after the asterisk.
Example 6: Rearranging information.
Our photographer has decided that he would like to display the sizes of our photos on the left and the filenames on the right of the equals sign. Photos containing comments only should remain as they are. Here is the text:
DSCa_0004 = 6*4
DSCa_0007 = 5*7
DSCa_0015 = Do this on canvas
DSCa_0997 = 6*4
DSCb_0002 = 8*10
DSCb_0004 = Can you print this one in matte
DSCb_0011 = Make 3 copies of this one
DSCb_0015 = 6*4
Again the asterisk is our unique identifier of the sizes. Here is the regexp:
Find: \(.*\)\(= \)\(.\*.*\)
Replace with: \3 \2\1
And here is the output:
6*4 = DSCa_0004
5*7 = DSCa_0007
DSCa_0015 = Do this on canvas
6*4 = DSCa_0997
8*10 = DSCb_0002
DSCb_0004 = Can you print this one in matte
DSCb_0011 = Make 3 copies of this one
6*4 = DSCb_0015
Our photographer could have done this at the beginning of Example 5 (if he wanted to). Here is the text from Example 5:
DSCa_0004 = Do you think you could print this one 6*4
DSCa_0007 = Print this one 5*7
DSCa_0015 = Do this on canvas
DSCa_0997 = Dave, print this 6*4
DSCb_0002 = Print this one 8*10
DSCb_0004 = Can you print this one in matte
DSCb_0011 = Make 3 copies of this one
DSCb_0015 = Print this one 6*4
And here is the regular expression that will (a) get rid of all info apart from sizes, and (b) rearrange the order of the text to size = filename:
Find: \(.*\)\(= \).*\(.\*.*\)
Replace with: \3 \2\1
And here is the output:
6*4 = DSCa_0004
5*7 = DSCa_0007
DSCa_0015 = Do this on canvas
6*4 = DSCa_0997
8*10 = DSCb_0002
DSCb_0004 = Can you print this one in matte
DSCb_0011 = Make 3 copies of this one
6*4 = DSCb_0015
As you can see, the two outputs are identical.
These are only a few examples of how regular expressions can be used. I hope that these examples will be useful for you and will provide some guidance and stimulation about what is possible with regexp. If you have any questions, please post them in the comments below.
30 January 2009
Figures and captions in Word
Writing a thesis in Word is, let's say, challenging. As the document grows, Word tends to become less stable. This is particularly the case if you do a lot of chopping and changing. Sometimes, figures, graphs, and images move, or don't move when they should, or become separated from their captions, or disappear completely. This appears to be random behaviour and can be very frustrating. For this reason, I have put together this guide which will keep your figures and captions together and will help maintain what's left of your sanity.
Step 1: Insert the image
Before inserting your image, reveal all formatting characters (shortcut: Ctrl+Shift+8). Press Enter at the part of the page where you want to insert your figure, this creates a carriage return character, and then select Insert | Picture | From file. Select the picture and then click Format | Picture, and click on the Size tab to resize the picture as needed.
Step 2: Create the caption
Click on the picture once then select Insert | Reference | Caption. Name the figure and click OK.
Step 3: Group them
Select both the caption and picture, then right click and select Grouping | Group. Now right click on the newly grouped object and select Format | Object. Click the Layout tab, then the Advanced button, then the Text Wrapping tab and select Top and Bottom, click OK.
Step 4: Select and lock the anchor
Now click on and move the anchor to the carriage return you created earlier.Get back into Format Object | Layout | Advanced, and click Lock anchor and set Horizontal Allignment to Centered relative to margin, Vertical Absolute position set to 0 below paragraph, tick Move object with text and Layout in table cell. Click OK.
Step 5: Format the caption
Click on the caption and format the text according to your figure caption styles. For APA, you will need two: one for the Figure x. part (in italics) and another for the title of the figure (not in italics).
Now you can make edits, add or remove paragraphs and your figures and captions will not disappear when you break over a page. Easy, no?
Subscribe to:
Posts (Atom)